We often hear that wood floor sanding is a very essential process in the lifespan of solid wood or an engineered wood floor. We hear about the benefits of wood floor sanding, how it can improve the condition and appearance of the floorboards, how it ensures good protection from potential issues and problems, and how it removes the issues and imperfections and minimises all risks. However, do we really understand wood floor sanding and its essence? Do we really know enough about the purpose of wood floor sanding and why we are spending our hard-earned money on this pretty costly professional service? When investing in a real wood floor and investing in its regular and proper maintenance, you want to know that every penny is worth it and will pay off.
There are as many reasons for choosing a wood floor sanding service as there are real wood floors and their owners. Some would opt for professional treatment because they want to beautify their floor and make it appear fresher and newer. Some will choose sanding because of the chance it offers to change the look, the sheen of the floor, and even it's colour. Others will invest in wood floor sanding because they are dealing with more serious issues that can grow even bigger and turn out to be beyond repair if left neglected. No matter your reason, if you opt for wood floor sanding, you would like to know as much about this professional service as possible. Therefore, in today’s article, we answer five in-depth wood floor sanding questions in order to fill in your resources of knowledge in this field. Stay tuned and learn more.
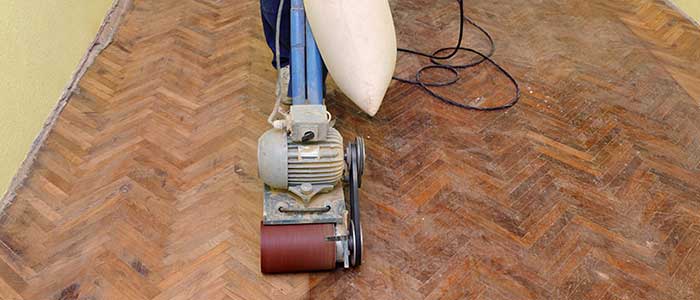
Do you sand with a slight angle with the first pass of the sanding machine?
The first round with the big drum sander machine should be done at a slight angle and this has a few important purposes. In order to cut the floor flat the fastest, the angle of the sanding machine should be 7 to 15 degrees to the direction of the floorboards. When you are sanding at a slight angle, you are cutting slightly across the grain of the floorboards. This cross-grain cut is known for sanding the floor the quickest and is very effective. In addition, the cross-grain cut also takes out any slight rolling or waves of the floor. Once you start with the cross-grain cut and finish the whole floor, make sure to continue the next pass with the sanding machine by cutting straight with the grain so the scratches left from the cross-grain cut are removed.
Where to start working with the floor sanding edger?
Some wood floor professionals start working on the floor with the edger and then continue with the big, heavy-duty drum sander. However, the majority of the sanders out there would start working with the drum sander first, and then continue with the edger. Therefore, you may be wondering when and where the sanding edger comes into play? Before you start working with the sanding edger, you should be aware of where the cutting point is for that edger. This is important because you want to control the cut pattern. Setting up an edger requires experience and if you don’t know or you are not sure how to do it, make sure to reach out to the manufacturer and ask for instructions or contact your local wood flooring service provider and they will be able to help you and give you tips.
Once the edger is set up and works properly, you can continue by starting to work with it from left to right around the perimeter of the area. Out of all sanding machines, the rotary cut of the edger is definitely the most aggressive cut. In order to minimise the edger swirl marks, you should keep the scratch pattern with the grain as much as possible. You can also soften the cut of the abrasive, simply use edger pads, which are placed under the bolt with an abrasive disc for the final edging. The edger pads ensure that the abrasive disc is cutting less aggressively and is leaving finer scratches.
When is the best time to trowel-fill the wooden floor?
If you are a beginner DIY wood floor sander, you should be aware that trowel-filling the floor should happen before the last cut with the big drum sander and the final edging since it will provide you with sanding guidance on the last abrasive cut. The trowel-fill is a great way to show you the different marks and low spots that need additional sanding attention with the buffer before you finish the entire project. Before you continue with sanding, always make sure to filler is absolutely dry, allow enough time. In case you don’t wait long enough for the filler to be absolutely dry, the filler will load the abrasive and you will have to use more abrasive than necessary, which is pretty much a waste of time and money.
Before you start with trowel-fitting, make sure that all nails are intact and all nail heads are secured and set, not popping out. Sanding the nail heads can destroy your sanding machine and will most probably leave additional heavy marks on the floor. In some cases it is expected that the sanding screen won’t be able to completely flatten the floor there and this imperfection won’t become visible before the last coat of finish is applied, which will be too late and you will have to start with the entire sanding and refinishing project all over again.
Sanding screen vs hard-plate – when to use them?
Sanding screens work together with the buffer machine for blending the final scratches left by the more heavy-duty sanding machines and leaving the surface even and smooth. In order to reduce the initial scratching, make sure you are always starting a new screen in a closet or other area that will be hidden most of the time. The best direction of movement is starting from the wall to the centre of the room.
Once you change the screen, if it is needed, make sure to start with the new screen on the opposite wall and work your way toward the centre of the room. This will help you make the scratches match. The hard-plate discs are used in the same manner. Hard-plate discs are double-sided, easy-change abrasive discs and are more rigid than a screen. Therefore, hard-plate discs are used for cutting the floor flatter than what you can achieve with a screen. It is often the preferred method when it comes to wood floors made out of denser hardwood species.
Why it is important to check the moisture content of a floor before sanding?
It is quite often and even necessary for the moisture content of the subfloor and the floorboards to be checked before installation of the floor. However, does the moisture content of the floor matter when it comes to a wood floor sanding project? Of course, it does. Sanding and refinishing your wooden floor should happen only when the floorboards are well-acclimatised to the moisture content of their direct environment, the normal indoor humidity and temperature of the room, where the floor is installed. Checking the moisture content of the floor prior to refinishing it with a waterborne finish is important because it will give you a baseline value of the moisture content prior to applying the finish. Once the moisture content is back at its original reading, you will know that the waterborne finish is already dry.
Be the first to comment on this post.